Physical Address
304 North Cardinal St.
Dorchester Center, MA 02124
Now that we know the general approach, we’re ready to start automating the process of calculating these polynomials. I’ve been using Rust for my past few projects, but out of pure laziness, I decided to develop a Python script for ease of development. When I was doing my undergraduate thesis, I developed some Matlab routines which can be found here.
I’ve posted the Python script to my Github account here.
The first thing we’ll need to figure out is how to encode, or represent, a chessboard. General chessboards can come in many shapes and sizes, and can have any number of restricted cells.
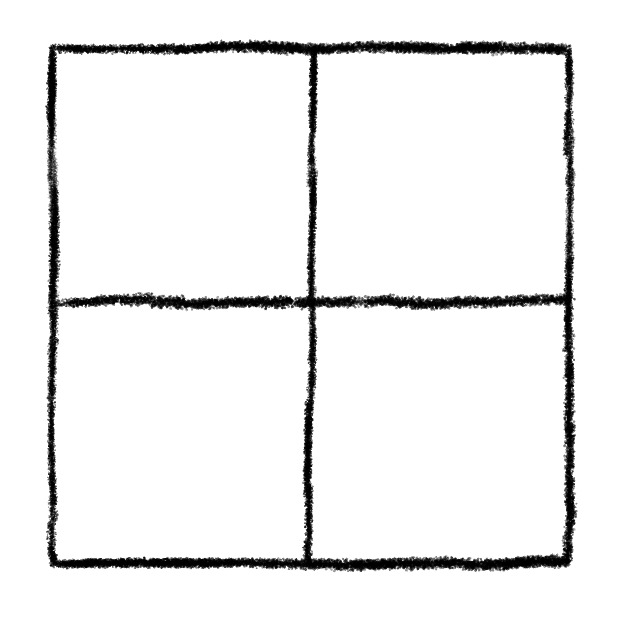
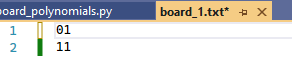
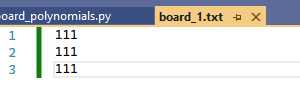
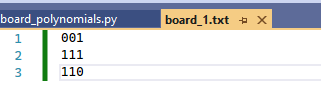
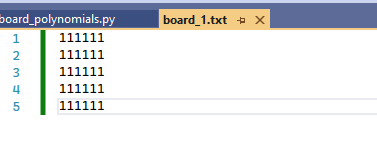
We can use a relatively simple format. Basically, the only data we’ll allow in our file is 0 and 1. We’ll use a 0 to represent a restricted cell, and we’ll use a 1 to represent an available cell. We’ll line up 0s and 1s in a line in the text file to represent one row of the desired chessboard, and we’ll put in a line in the file for each row in the chessboard.
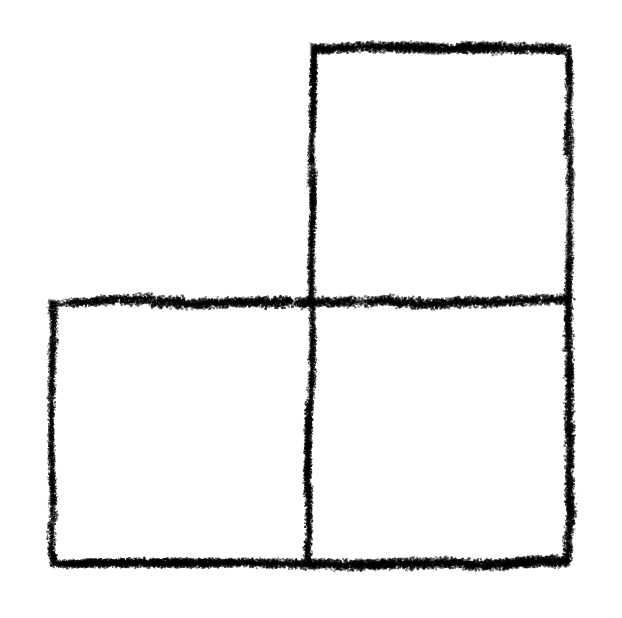
Any other symbol will be ignored (including spaces.) Here are a few examples of some board encodings.
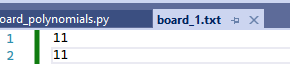
I developed this script in Visual Studio, and all text files were edited in Visual Studio as well. Throughout this post, I’ll just use “board_1.txt” to hold my chessboard data, as you see in the image above, and in the following images.


Note that in each file, every row had the exact same number of 1s and 0s. The way the script works, it relies on every row having the same number of elements. It was not tested on any text file where the rows had different numbers of elements, so if you experiment with this script, be careful. It is a work in progress after all.
Now that we know how to define a chessboard in a text file, we need to know how to use the data within the script.
Python offers a list type. Lists can store any kind of element we want. The problem is that we need multiple lists, one for each row in the chessboard. In our case, what we can do is just store each of these lists inside of another list.
Note that when we load the text file data into our lists, the 0s and 1s in the file will not be numerical, they will instead be textual. So, our lists will be storing strings, each of which is either “0” or “1”.
The basic procedure for loading this data into our program looks like this:
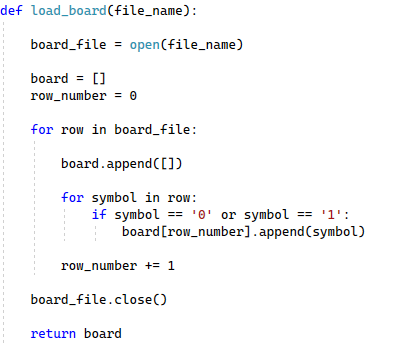
So, we’ll take in a file name, read it line by line, and store each ‘0’ and ‘1’ into a list. Each of these lists will then be stored inside another list. This will let us refer to every row of the chessboard using one name, instead of having to have a named list for each row. As you can see, the only data we’re looking for is ‘0’ and ‘1’. If you are feeling spunky, you could provide a text file that has other symbols in it, and you could get it to work. Of course, that just makes things harder than they need to be, so I don’t know why anyone would bother doing that. I’m just pointing it out for clarity.
Note that because we are creating a list of lists, we’ll need to keep track of the current row we’re working on so we can append new data to the correct inner list.
Once we’re done we will – of course – close the file, and return the data. The parsing wasn’t too difficult, which is always nice.
Now that we have a handle on chessboards, we’ll need to figure out a way to store and represent polynomials in code.
We can think of polynomials as n-tuples of real numbers, each representing a coefficient. We can list the coefficients in either ascending or descending order. Python lists can come in handy here as well. Because we’re using polynomials to count rook placements, we’ll list coefficients in ascending order. For example, we would represent the polynomial 1 + 9x + 18x2 + 6x3 using a Python list as [1, 9, 18, 6].
Now that we’ve got an idea about how we can represent chessboards and polynomials in Python code, we are now in a position where we can start automating the process of Rook Polynomial calculation.
Our general strategy, developed in the previous post, was to decompose a chessboard into simpler chessboards, and recursively build up the Rook Polynomial. Naturally, we’re going to use a recursive procedure to do the calculation.
When developing recursive procedures, we should figure out what base cases we’ll need to consider in order to terminate the recursive process. For our purposes, there are only two cases we need.
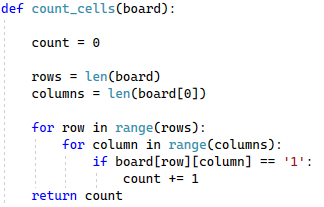
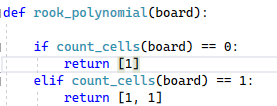
The first base case will be when all cells have been restricted from any rooks. Once this happens, we know we’ve finished our recursive procedure and can return the Rook Polynomial. What is the Rook Polynomial for a chessboard where every cell is restricted? Well, the only thing we could do is not place any rooks at all. This is equivalent to placing 0 rooks on the board, for which there is only 1 way to do so. In this case, the Rook Polynomial is just R(C, x) = 1. In code, that means we need to return [1].
The last base case we need is for the 1-by-1 chessboard. Here, the Rook Polynomial is R(C, x) = 1 + x. In code, that means we need to return [1, 1].
This is why we need to start our recursive procedure by counting the number of available cells in the board. It lets us know if we’ve reached a base case, which requires separate logic from the more general case.
If we are not in a base case, we’ll need to decompose our chessboard. This means we need to pick an available cell, and then consider what happens if we either place a rook on it, or restrict it from rooks entirely.
When calculating Rook Polynomials by hand, we may sometimes be able to pick “clever” cells that can help us reduce the amount of work needed. Because we’re automating the process, it does not really matter too much what cell we pick, as long as it’s available. As such we can just use the first cell we find.
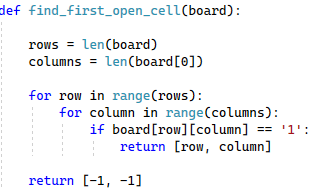
Here, we are doing a row-major search to find the first open cell, which is indicated by the first ‘1’ found in the board array. If we don’t find any cells, we need to be able to indicate the fact that no cell can be found. Using -1 as a row number and column number is an easy way to let us know such a cell does not exist.
Now that we know where we will decompose our board, we need to construct two separate boards – one for each decomposition – to use in our recursive procedure. One board will have the cell’s row and column set to ‘0’, representing a rook placement on the found cell. The other board will only set the found cell to ‘0’, representing the fact that it will not have a rook placed on it at all.
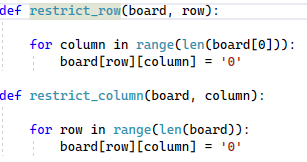
Because we are storing board data in a list of lists, it’s better to have a function handle this for us. The two functions above work through the row and column specified, and sets all their respective elements to ‘0’.
Once the Rook Polynomials from both decomposed boards are known, we need to add them to get the final result. Just like in normal, hand-written polynomial addition, we iterate over each polynomial, and add the coefficients of corresponding terms to get the new coefficients.
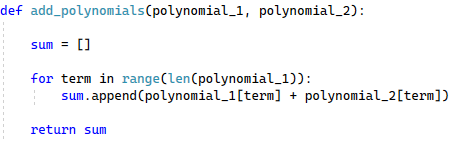
Make note of the fact that we are using the length of polynomial_1 to count the number of iterations needed. We’ll explain why shortly. Just know that again, we are using a list to represent the sum, and each element in the list is just the sum of the corresponding elements in polynomial_1 and polynomial_2.
Seeing as this is the first iteration of this script, we’ll want to make sure everything is working as well as it can now before we add more advanced functionality later.
At this stage, we really just want to make sure that the board data is being read in correctly from the file, and that the polynomials that are produced are correct. We’ll also need to make sure the boards are being decomposed correctly.
We can write a routine to print out what the given chessboard looks like. For each row, every time we encounter a ‘1’, we can print out the string ‘[]’ representing a cell. We’ll print a space character using ” ” when we see a ‘0’ because that represents an empty or restricted cell, which is supposed to be factored into the polynomial anyway.
Similarly, we can print out what the final polynomial looks like. Python already knows how to print out lists, so this is a little bit more than necessary, but it is somewhat nice to see the actual polynomial, which includes the powers of x. If we don’t care, we can always just print the list of coefficients.

According to the Python standard library documentation, you can specify an “end” string with which to terminate printing. If you want every cell in the row to be printed on the same line, this is an easy way to achieve that.
It is always a good idea to use a debugger when doing any software engineering or development, but it can be a pain to use a debugger (and somewhat counter-productive) if you don’t at least have some idea about what may be the cause, or where in the code any issues may be occurring. Print statements get a bad rap, but they are extremely helpful in isolating where problems may be occurring, and can help you use debuggers far more effectively. Print statements and debuggers are both powerful tools, and both should be used liberally. As a side note, there are ways of including debug print statements in code and not having them execute in production without having to delete them, but that is not what this post is about, I just wanted to mention the fact that such functionality exists.
This just about covers all of the functionality we need, so we are ready to put all of the pieces together.
We’ll go through this step-by-step as we just covered. First we’ll count the number of available cells to check if we are in a base case.
If we are not in one of the two base cases, we’ll need to find a cell on which we can do the board decomposition. Again, we’ll just use the first cell we find. We’ll copy the board twice, being careful to ensure we use a deep copy so as not to affect the given board. We will restrict the appropriate cells on each sub-board. For the board where we place a rook on the found cell, we restrict the entire row and column. For the board where we don’t place a rook on the found cell, we restrict that cell (and only that cell) from any further rook placement.
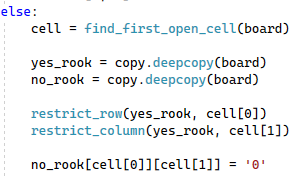
Now, we need the Rook Polynomial for each sub-board. Luckily we are currently developing a recursive procedure to do just that. We call our recursive rook_polynomial function on each sub-board, and store the result of each call. Remember that we need to increment the exponent of each term in the polynomial representing the decomposed board with a rook. This can be done by simply shifting all terms in the list up one position, and inserting a 0 at the start.

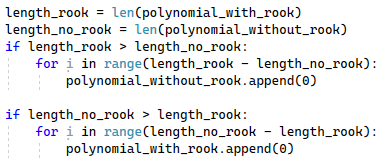
Now that we have the Rook Polynomial for each sub-board, we add the polynomials together. Remember earlier when we said that in the add_polynomial function we used the length of polynomial_1 to do the iteration? That’s because before we call the function, we ensure that both polynomials have the same length. We do this without affecting the polynomial by simply appending 0s to the end of the shorter list. This makes adding the polynomials easy, though this certainly isn’t the only way this could be done.
Now we can add the polynomials together and return the result.

This script is being developed as a command line tool, so we’ll need to be able to call it from the command line. We want to be able to supply the name of a text file containing the board data we want to use as a program argument.
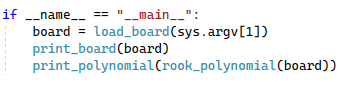
As of right now, we’ll just print out what the program thinks the board looks like, and what polynomial it calculates.
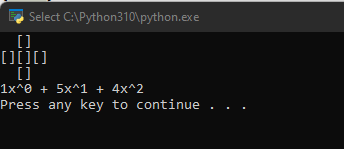
Here are some example script executions.
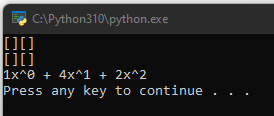
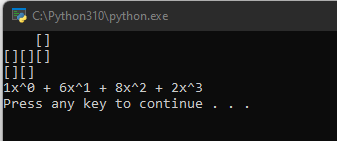
This is promising. It is producing the exact same answer we got when we calculated the Rook Polynomial of the 2-by2 board by hand. Lets look at some more examples.
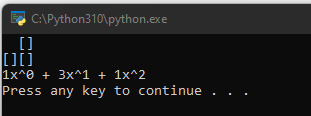
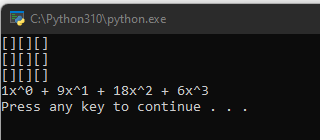
For the full 3-by-3 board, we got the same result as we have been getting when doing the calculation by hand. At this point, we can probably feel confident this script is working.
Back in the first post in this series, we worked through an example of assigning band members to band positions to introduce what a Rook Polynomial was. We didn’t answer the question of how many such assignments were possible, instead opting to work through a simpler example of assigning 3 technicians to 3 pieces of networking equipment. Based on the second post in this series, we can probably guess that calculating such a polynomial by hand would take a long time, and a large amount of patience. With our script, the process takes less than a second.
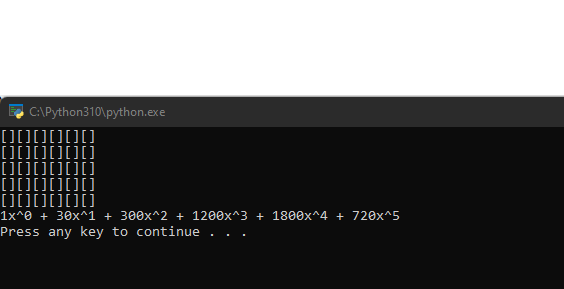
So apparently, there are 720 ways to assign 5 band positions among 6 band members. It is worth pointing out that this is simply 6!. Is there an easier way to calculate this?
We can think of placing rooks one row at a time. Let’s start with the first row. There are 6 possible spots for the first rook. Then in the second row, there are 5 possible places to place the rook. As of now, placing the first two rooks has yielded 6 * 5 = 30 possibilities.
Continuing on in this matter, we’ll see that the third rook has 4 possible locations, the fourth rook has 3 possible locations, and the fifth rook has 2 possible locations. Of course at this point, there is only one possible thing to do with the sixth rook, which is to not place it on the board.
In total, there are 6 * 5 * 4 * 3 * 2 * 1 = 6! = 720 possible locations. It is not necessarily this easy when placing fewer than 5 rooks because not all rows may be used. Also, we didn’t have to deal with any restricted cells. This is the power of Rook Polynomials, and having this script will make further work much easier.
The first two posts in this series reflect what I learned in my second discrete math course in college. I didn’t cover all of the details I learned, I just covered enough detail to get to the point where we could automate the calculation of these polynomials as described in this post.
Rook Polynomials are incredibly fascinating, and are definitely worth learning more about. The book I used is the fifth edition of “Discrete and Combinatorial Mathematics” by Ralph Grimaldi. The relevant chapters are 8 (where Rook Polynomials are introduced) and 9 (where the theory of generating functions is more fleshed out.) It’s a great book overall and highly worth working through. Discrete math was such a nice breath of fresh air after heavily focusing on calculus and linear algebra for most of high school and early college, so definitely worth considering.
It’s at this point where my particular thesis work began. In the next post, I’ll describe some of the next steps that I took, and some of the next steps someone else may take if they wish to explore this topic further.